Project Overview
Play as a bounty huntress to collect glowing gems, find clues, and cast spells to kill the beast that torments the town of Strikefel.
Team Size: 10
Timeline: 5 months
Responsibilities:
-
Blocked, set-dressed, and lit a mid-sized open world environment that encourages exploration via paths, distinct landmarks, and resources to collect.
-
Designed and implemented the boss that hunts the player as they explore then fights them with progressive difficulty, a respawning resource system, and spell-casting for use in combat and resource gathering
-
Developed a mystery that grants a separate ending if solved by interacting with clues hidden throughout the environment
Grimblight Level Design
Note: Website still under construction. This page will be expanded with more diagrams, gifs, and text
Level Design Goal:
The goal was to construct an open-world forest of modest size, dense enough with trees and fog to give the illusion of scale. Collectibles, paths, and landmarks should guide the player throughout the area, and orient them whenever they wish to return to town. Above all else, the player should feel on-edge by the oppressive atmosphere as they're hunted by The Beast
• 2D to Final Product •

2D Sketch:
I began the layout process with a digital 2D sketch, which helped me run through several possible formations of the Forest.
The design revolved around using paths to naturally lead the player into discovering its 3 collectible Clues. Each clue is coupled with a unique landmark (in purple). The central dirt path leads the player back to town, which serves as their HUB and safe-haven from combat
Forest Layout Sketch


Blocked Out Forest
3D Blockout to Set Dress:
The map was blocked out in Unreal using Speedtree for the trees, and Unreal's natural deformation tools for the terrain. The Dried River was plotted out to be a different texture that would distinguish it from the dirt.


The tutorial arena-- where the player learns the battle mechanics-- was much simpler in comparison, partially to avoid stealing the thunder from the Beast's arena which needed to be more harrowing.


Set Dressed Forest
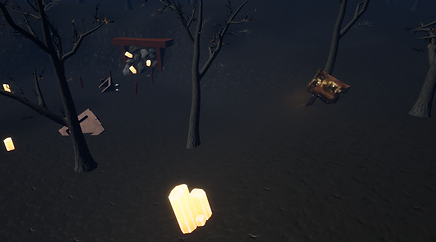
Our asset modelers & texture artists then finalized the trees, landmarks, Lumite (the glowing gem collectible) town buildings/fence posts, rocks, etc, and I meticulously placed them ensure proper spacing and visual composition. Finally, I lit the map to be shrouded in fog, with the glowing Lumite gems piercing the darkness to guide the player.
Battle Arena Process:
The game is split into Forest exploration sections, and shooter sections with the player is locked in place to fight The Beast. I had to pay special care to the lighting and set-dressing of The Beast's arena, since with the player constricted to 1 viewpoint it needed to be an effectively chilling visual


• Level Walkthrough •

Core Premise:
The game takes place on an elevated plateau called Deepwood Mesa, dense with trees and fog. These woods are lit by glowing shards of Lumite that lead the player throughout the wilderness by collecting them to later buy dynamite in town, also leading the player into the major landmarks and their clues. However the player must be cautious since standing near Lumite is the only way to deter the Beast when it pursues you, ergo leaving some open as an escape route is essential.


Lumite Guided Forest Exploration:
-
The player is led throughout the woods by the Lumite deposits of various sizes correlating to quantity
-
Deposits increase in quantity the further away from town they are
-
3 Main Paths:
Three paths lead the player from landmark to landmark, as well as back to town when enough Lumite is gathered to buy dynamite
-
1. (blue) Lantern Mine Trail
-
A row of lanterns on each side lead directly from town to the destroyed mine. This will likely be the players 1st path they chose, and leads to the most apparent clue to the game's mystery
-
-
2. (yellow) Dried-up River
-
A dirt ditch winds around the Mesa, leading players the follow it to both the Graveyard and Campsite clues
-
-
3. (orange) Lantern Campsite Trail
-
This is a path that deviates from the mine trail via a single line of lanterns perpendicular from the path. It's a long stretch, but the Campsite at the end can be seen from early on when following it
-


-
Another deposit is almost always visible from the last one gathered
-
Lumite respawns on a timer, forcing the player to make circuits around the Mesa before ending up back in town, coming across various landmarks as they do.

Strikfel (Town):
-
In Strikfel, the player is safe from the Beast due to the Lumite lanterns warding it off, and pike wall around the town--connected to the woods via bridge. Here players can...
-
Buy Dynamite using Lumite from the Shopkeep
-
Talk to citizens if their lights are currently on for flavor-text ending with being given free Lumite
-
Investigate clues found by presenting them to certain citizens who can help
-
Replay the tutorial via the summoning circle near the enterance (where the player also respawns after death)
-


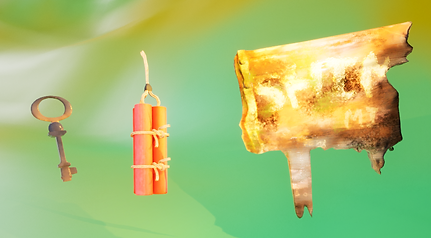
3 Landmarks:
Each of three landmarks is coupled with its own clue that can be brought to town for investigation. The clues are illuminated by a purple lantern to distinguish them from their surroundings.


-
Destroyed Mine w/ Sign Fragment Clue
-
Directly across from town and likely the first landmark to be seen, so the clue is very open to alert players that this game has clues early on without explicit tutorialization.
-
Lumite sticking from the Mine them draws attention to its story-relevant destruction
-


-
Abandoned Camp w/ Key Clue
-
Following a lantern path away deviating from the Mine path, OR following the dried river will lead to this landmark (both can be used to retrace steps back to town as well)
-
The largest Lumite in the game rests here and is implied to have been used as a campfire
-
-
Graveyard w/ Burnt Dynamite Clue
-
Following the dried-river left (which divots down into the landscape) after exiting town will lead to this area, illuminated by lanterns on pikes
-
To encourage exploration of this area, some sizable Lumite can be found here despite being close to town-- an exception to the distribution rule of greater deposits being further away from town
-


Cursed Lumite:
The player can manually enter the Beast's Lair by standing near Cursed Lumite, located directly to the right of Town
-
Following the river from Town will lead to it
-
This Lumite only appears after the 1st encounter with the Beast
-
Standing in it's "Aura" bubble begins the summon, and leaving it ends the summon
The Beast's Lair:
The player is immobile accept for their ability to cast spells in the Beast's Lair.
-
The narrative implication is that the Lair is the inside of the destroyed mine where the 3 miners that became the Beast died, hence the minecarts and cursed Lumite inside
-
Cursed Lumite here has a connection to the deposit in the overworld that teleports the player


Combat Tutorial:
The player can take the combat tutorial from the Summoning Circle where they also respawn after death.
-
The tutorial is comprehensive of the unique combat mechanics the players must master to beat the game-- attacks, dodging, dodge charges, counters, etc.
-
The tutorial is optional, but the player does begin the game facing the Summoning Circle to immediately give them the option to try it
-
Best of both world's in not forcing players to, yet making the option obvious and accessible to all
-
• Design Techniques •
Lumite's Conflicting Affordances:
Lumite has 2 conflicting affordances
-
Currency, which is collected by destroying it
-
Safety, which is utilized by entering its safety aura
The player must balance these to affordances to avoid leaving too little affordances to use as safety, or not collecting enough for dynamite


Lumite will arise again from under the earth 3 minutes after collection, so the player knows they won't permanently collect them all


Failure Mitigation at Respawn:
In Strikefel, various buildings will light up as the player progresses, signaling the player can speak to the residents inside.
Each of these interactions ends in the resident granting the player an amount of Lumite--whether from the resident being grateful, scarred of the player, or to mock them.
In effect, this grants the player a pool of free lumite they can draw from (often whenever they respawn in Strikefel) which mitigates the Lumite that the player loses from dying to The Beast.

Risk Incentivisation:
The player is incentivised to travel deeper into the woods, away from the safety of the town, by
-
Higher value lumite, which is more prevalent further into the map
-
with several giant 6 value deposits at the furthest edges
-

-
The 3 clues, all located a ways off from town and requiring concerted exploration to locate.
-
All clues must be shown to a knowledgeable resident of Strikefel after collecting to be investigated, which encourages the player to double back after locating them
-
'Grimblight' Walkthrough
Watch the Full Walkthrough here